You can get scroll saw patterns for free to help you learn how to make intricate woodworking projects. The scroll saw can be used for many other woodcrafting projects such as making Lily-pad-inspired boxes or Hickory corbels. This project can also be used as a memorial or gift. You can read more about it in the article below. If you have trouble deciding on a scroll saw pattern, check out the links below!
Scroll saw patterns free
The Free Scroll Saw Patterns cross section can be a great source of inspiration for those who are just starting out with woodworking. These patterns include basic designs for beginners as well as more advanced designs for experienced scroll saw users. These patterns can be used for fun and practical crafts that you can make for the kids in your life. Here are some of these most-requested patterns:
One of the easiest and most popular types of scroll saw patterns is the tree. This design is elegant and a great choice for woodworking challenges. These patterns can be customized and made to match your own tastes. While some of these patterns are straightforward, others are more intricate and elaborate. The cross will add elegance to any shelf or mantel in your home. They can also be used to bring rustic charm into any home or office.
A self-contained puzzle is another easy pattern. This project will require a lot work and requires many pieces of wood. However, it will increase your skills as well as help to release any nerve energy. You can also create a standalone VW Beetle. This is part decoration and part exercise for your brain. The best part about it is that even though they will not know how much you put into it, it will still look great.
Lilypad-inspired boxes
To beautify your garden, you can use a scroll saw to cut lily pad-inspired boxes. The boxes are a great place to store extra soil. You can also use decorative accents such a colorful ribbon. And, they make great gifts, too. These patterns are very inexpensive and easy to make. You'll be surprised at how easy these scroll saw designs are.

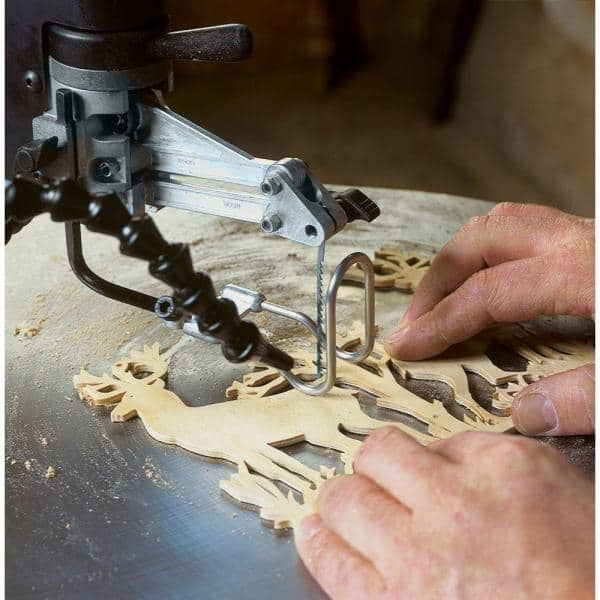
These scroll saw patterns can be used by both beginners and experienced users. These patterns can be used as wall decor, attached to magnets on your refrigerator, or made into suncatchers. You can download PDFs that provide instructions on how to use your scroll saw. These scroll saw patterns can be made into ornaments for the home, garden, and office.
There are many scroll saw patterns that you can download for free. These patterns are easy to cut for beginners. For more experienced woodworkers, more challenging cuts can be attempted. These patterns can also be used to make beautiful crafts. They are easy to follow and can be displayed almost anywhere. These gorgeous creations will be proudly displayed in your home.
Corbels made of Hickory
The sapwood of hickory has a darker heartwood, and the sapwood is lighter and more tender. It is a beautiful stain and holds nails and screws well. Hickory can be used to make scroll saw patterns. It ages beautifully. Hickory is not suitable for outdoor use due to its great flexibility. There are three reasons why hickory should be avoided for projects that will withstand moisture.
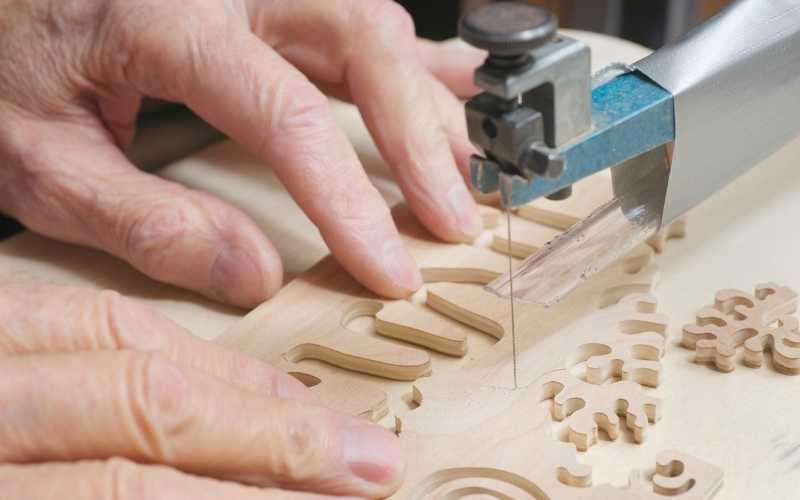
First, you'll need a good scroll saw. This blade is great for creating intricate curves. The scroll saw can be used for furniture projects as well as toys for children. These wooden toys make great focal points for any room.
A scroll saw is an excellent way to show off your woodworking skills. You can make a corbel out of hickory and incorporate it into other projects. These projects make great gifts for family and friends. They can also add beauty and charm in any room. Although they are not difficult to do, it does take patience. A scroll saw can be used to purchase a pattern or make one yourself.
FAQ
How can I keep my shop organized?
To keep your workshop tidy and organized, you should first create a place for tools storage. Your tools will stay sharp and ready to go when they are free from dust and debris. Use pegboard hooks to hang tools and accessories.
How do I know what tools are best suited for me?
It's important to consider your preferences and needs when buying tools. Do you prefer metal or plastic handles What size screws or nails do you prefer? Do you prefer to use hand tools or power tools?
Can you teach yourself woodworking?
It is best to do it yourself. Woodworking is an art that takes patience, practice, skill and experience. Any craft requires patience to master.
To actually learn something is the best way. Start small and then build upon what you've learned.
Do you have any suggestions for starting a woodworking shop?
It's not easy to start your own woodworking business. However, if you are passionate about your hobby you will be willing to put in the effort. You'll likely enjoy the challenge of owning your business.
When you are launching a new venture, it is important to be aware of the possibility that you will encounter unexpected difficulties. You might run out money, or you may have to borrow unexpectedly. Perhaps customers won't pay you as much as you had hoped. To survive, you'll need to be prepared for such situations.
One tip is to have a separate banking account for your company. You'll know exactly how much money is coming in by setting up a separate bank account.
What types of woods are best for furniture making?
Woods are classified based on their hardness. Softwoods include cedar and pine as well as cedar and cedar. They're often used for outdoor furniture because they don't rot easily. These hardwoods include maple, mahogany and teak. Because they are not weather-resistant, they are best used indoors.
Do I have to refinish my furniture?
Yes! There are many options for refinishing furniture that you don't need to hire a professional. Here are a few suggestions:
Use sandpaper for removing stains and scratches. Then wipe down the surface with a clean cloth.
Apply clear polyurethane paint. Allow furniture to dry completely before you move it around.
Paint furniture with acrylic paint.
Instead of using paint, stain is a better choice. The furniture will have a rich look thanks to the stain.
Use shellac wax. This will protect and shine the wood.
Where can I start woodworking?
It is best to actually build furniture to learn how to make it. While you will need tools, mistakes are inevitable, but you will learn the ropes if you persevere.
First, choose a project you would like to complete. It can be as simple as a small box, or as complex as a complete entertainment center. Once you've decided on a project, find a local woodworker who specializes in that kind of work. Ask him or her for advice on what tools you'll need and where to find them. Ask if you can find someone who does this kind work.
Statistics
- Woodworkers on the lower end of that spectrum, the bottom 10% to be exact, make roughly $24,000 a year, while the top 10% makes $108,000. (zippia.com)
- The best-paid 10 percent make $76,000, while the lowest-paid 10 percent make $34,000. (zippia.com)
- Overall employment of woodworkers is projected to grow 8 percent from 2020 to 2030, about as fast as the average for all occupations. (bls.gov)
- Most woodworkers agree that lumber moisture needs to be under 10% for building furniture. (woodandshop.com)
External Links
How To
How to join two pieces of wood together without nails
Woodworking is a hobby that many people enjoy doing. It's fun and relaxing because you can use your hands to make something useful from wood. There are times when two pieces of wood need to be joined together. This article will demonstrate how to do so to preserve the beauty of your woodwork.
You will first need to trim the edges of your wood pieces before joining them. Do not leave any sharp corners as they could cause problems down in the future. Once you have done that, you can begin gluing your boards together.
When working with hardwood, glue should be applied only to one side. You should glue both sides if you are working with softwoods such as pine and cedar. After applying the glue, press the boards firmly until they are completely stuck together. Before you proceed to the next step, be sure to let the glue dry completely.
After you glue your boards together, drill holes at the joints where screws will be inserted. These holes will differ depending on the type and size of screw you are using. If you plan to use a 1/2 inch wood screw, drill a hole at least 3/4 inches in depth.
After drilling your holes, drive the screws into the board's backside. Be careful not to hit the front surface of the board, or else you'll ruin the finish. Be careful not to drive the screws too hard at the ends. This will prevent splitting in the end grain of the wood.
Now that your project is finished, you'll want to protect it from the elements. You can seal the furniture pieces or cover the top. Either way, you'll want to use a product that will last for years to come. Some examples include oil-based varnishes, polyurethane, shellac, lacquer, etc.
These products are available at most home improvement stores. It is important to ensure that you purchase the correct product for the job. Don't forget to keep in mind that some finishes are toxic. So, always wear protective gear when handling them.