A few tools are necessary to add texture to a piece or scene. The most widely used tool is the nail set. This is used to set nails. However, it can also be used to create small dimples on wood. A chisel is a tool that can be used to cut small surfaces. A chisel can be used for creating uneven, slightly faceted surfaces. It doesn't matter which type of tool is used, unique textures are key to creating amazing surfaces.
Substance Designer
If you're looking to create node-based texturing tools, then you're in the right place. Substance Designer, a texturing tool, is amazing. It allows you to easily create Substance files, bitmap textures and procedural effects. Substance Designer includes GPU-accelerated baking, a new noise generator, and hundreds of revised editing tools. It is loved by game developers and 3D artists alike.
It integrates seamlessly into existing work environments. Substance Designer includes many useful features, but it is also designed to fit into your existing workflow. This application does not have release notes, however the most recent version was released last January. Substance Designer is worth a look if you are new to 3D texturing. A trial version is also available for Substance Designer, giving you a good idea of the program's capabilities.
Material Baker 2
Material Baker 2 lets you create the most realistic textures possible for your game assets. You can also bake a texturing element into a single vertice or multiple vertices to replace the original color. The number of vertices used and the size and resolution of the maps used to bake textures will determine their quality and sampling. The Material Baker 2 is compatible with all major game engines. The Material Baker 2 Help Manual provides more details.
The Bake Section lists materials assigned to selected mesh items. The Bake Section lets you select a particular material to view the assigned objects. This tool requires knowledge of materials and shaders. The baked image will then be placed directly under the principled BSDF colorr in the Material. The baking workflow remains unchanged. The new baker has the ability to fix textures that are too thin or too thick.
Robert Sorby texturing tool
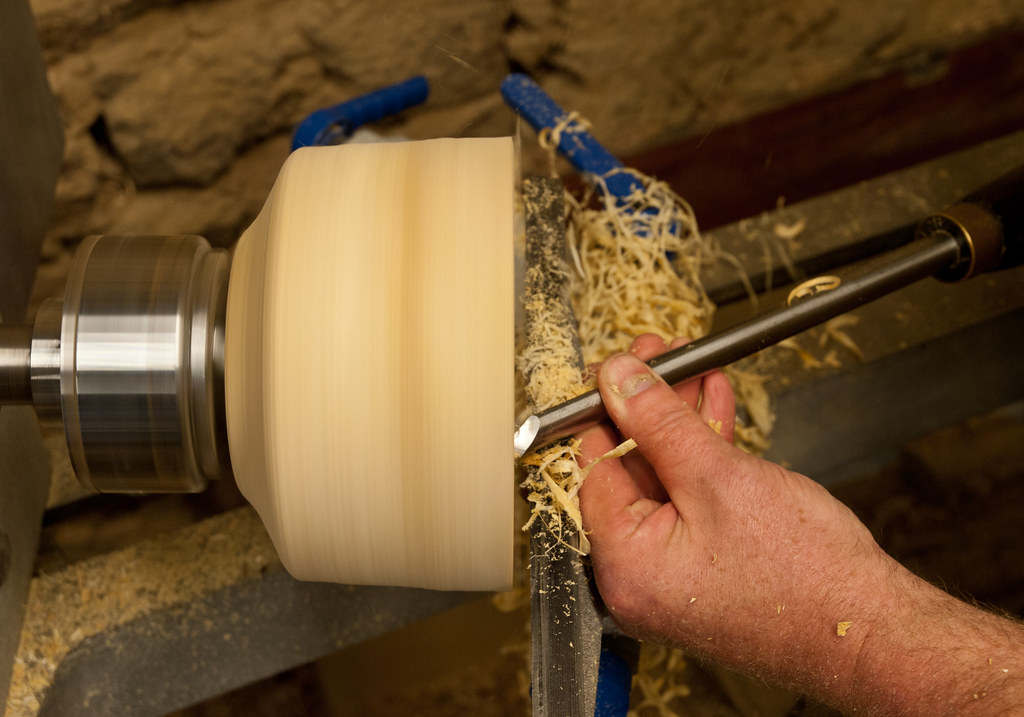
Robert Sorby Texturing Tool - A versatile tool for woodworkers. It can produce a wide range of textures on flat as well as end grain. These textures can vary in texture from soft and tactile to rough and dramatic. This versatile tool is simple to sharpen with the included diamond hone and comes with full instructions. It's great for woodworking projects of all sizes and complexity. It comes in two sizes including the micro-sized.
The 310H is equipped with an interchangeable cutter, handle and spindle. It allows you to alter the tactile and visual qualities of your work and add a unique touch to it. It is also versatile, and is great for woodturning projects. This tool is versatile and can be used with both hard and soft woods. It will give you hours of fun. You have the option of a handle-mounted or freestanding model. You can also add spiralling cutters or tool supports to make it more versatile.
Mari 3D paint tool
Mari 3D supports UDIM workflows, and a wide variety of textures and materials. Its Python API lets technical artists automate workflows and integrate them into their pipelines. The Materials System is a comprehensive tool that allows rapid creation and distribution of high-volume assets. Mari's ease-of-use and robust features also make it an excellent choice for new users. In this article, we'll look at the benefits of using Mari for 3D painting.
Mari was originally developed as a proprietary tool by Weta Digital. Weta Digital is a visual effects firm. The software was tailored to the Avatar Project's requirements. It is capable of creating high resolution textures on complex models while remaining responsive regardless of their scale. The software is designed to paint textures in context of animations and scenes, instead of individual objects. It is easy to use, making it a great choice for any 3D painting project, whether it's a demo reel or a movie.
Autodesk Mudbox
Applying textures to your 3D model in Mudbox can help improve its quality. The Autodesk Mudbox texturing tools can be used easily and offer many options. It's possible to import meshes with scan or sculpt data. This software supports baking displacement and normal textures. The software also includes dynamic tessellation systems and ambient occlusion maps. Autodesk Flame links to the program for data integration.
Mudbox is capable to handle many mesh models. You can use Quad meshes to create clean subdivisions. This will simplify your workflow. The program also comes with UV coordinates, which are used to paint 3D objects and attach texture maps to them. To accommodate texturing, it is advisable to unwrap and slice vertexes for complex polygon models.
FAQ
How can I organize my shop?
The first step toward keeping your workshop clean and organized is to set aside a designated area for storing tools. To keep your tools sharp and ready for work, keep them clean of dust and debris. To hang accessories and tools, use pegboard hooks.
Are you able to teach yourself woodworking
Doing is the best way to learn any subject. Woodworking requires patience, practice and skill. It takes time to master any craft.
It is the best way to learn to do something is to actually do it. Start small and learn from your mistakes.
What is the difference between a hobbyist or a professional woodworker, and how can you tell?
Hobbyists enjoy making things out of wood, whereas professionals focus more on the quality of their work. Hobbyists usually take pride in their creations and often share them with friends and family. Before they start working on a project, professionals will spend hours researching the designs. They will meticulously plan every detail of their work from choosing the right materials to finishing it.
What tools should I start with when becoming a woodworker?
Woodworking requires patience and practice. It takes time to learn how to use all the different tools and techniques required for woodworking.
There are many types of woodworking equipment on the market today. Some people prefer to use power tools while others prefer manual tools.
You have the freedom to choose what tool you want, but it is important that you select the right tool for your job. Start with a basic set if you don’t have any previous experience.
Another option is to learn how to use a router, which is used for cutting intricate shapes into wood. These routers can be purchased at most hardware and home improvement stores.
Is it easy to start a woodworking business?
Starting your own woodworking business isn't easy. There are many requirements and regulations that must be followed. However, it doesn't necessarily mean you must go through all the hassle of setting up a business. Many people choose to join existing businesses. You only need to pay membership and tax fees.
Statistics
- Woodworkers on the lower end of that spectrum, the bottom 10% to be exact, make roughly $24,000 a year, while the top 10% makes $108,000. (zippia.com)
- Overall employment of woodworkers is projected to grow 8 percent from 2020 to 2030, about as fast as the average for all occupations. (bls.gov)
- Average lumber prices rose about 600 percent between April 2020 and May 2021. (familyhandyman.com)
- If your lumber isn't as dry as you would like when you purchase it (over 22% in Glen Huey's opinion…probably over 10-15% in my opinion), then it's a good idea to let it acclimate to your workshop for a couple of weeks. (woodandshop.com)
External Links
How To
How to make wooden joints
This tutorial will show how to join 2 pieces of wood together. The "pocket hole joint" is a method whereby we drill holes into the wood and glue them together. If your wood is straight and flat, this method will work well. Dowel joinery might be a better option if your wood is not straight or flat. Here are the steps
-
Drill Pocket Hole Joints. You will need to measure and mark the exact location of your pocket hole joint. Use a jigsaw or handheld drilling machine to drill 3/8 inch deep holes at the ends of each wood piece.
-
Sand Smooth. You can sand the edges of the wood to ensure that it doesn't split.
-
Glue both sides together. Apply glue on both sides of the wooden plank. Allow it to sit for approximately 5 minutes before you clamp the pieces together.
-
Secure the pieces together. After the glue has dried thoroughly, secure the pieces so that they are flush.
-
Trim Joinery. Trim any excess wood surrounding the joint once the glue has dried completely.
You should leave enough space between the pieces to allow you to turn them inside-out.