A band saw's ability to make tight curves is limited by its blade. The cheaper models often come with a less expensive blade. Professionals may keep several blades in stock, while DIYers might only have one or two. When selecting the best bandsaw blade to fit tight curves there are several things you need to think about. The type or cut you are making determines the width of the blade. A narrow blade is best for delicate work. A 3/4-inch blade is best for straight cuts.
Variable pitch
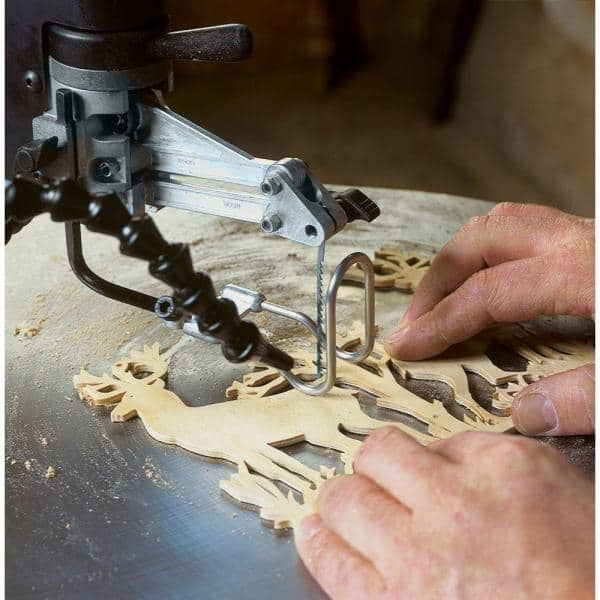
If you're tackling a tight curve, you may be wondering if a Variable Pitch band saw blade is right for the job. You may be wondering how to choose the right blade. This blade is capable to cut tight curves and closed spaces with ease. First, make some relief cuts around the curve to allow the blade enough room to turn. Once you have made relief cuts, take out any remaining waste to make the path clear for the blade.
The main advantage of this band saw blade is its high-quality teeth. The teeth of the band saw are subject to multiple forces as they cut through two walls of tube steel. As the saw advances forward, it releases the tooth by the downward feed force. Thicker chips, on the other hand, tend to stick to teeth and cause problems with the cut quality. The groove geometry promotes coolant flow and flushes out any chips trapped in the teeth.
Regular-tooth
Wide blades are recommended for cutting curves. The radius of your cut is determined by the blade's width. Blades with a smaller width are best for narrow curves. Blades with a larger width are better for resawing or line cutting. To determine the correct blade width for any given job, refer to the table below. This chart provides guidelines to help you choose the right blade width.

When choosing a regular-tooth band saw blade for tight curve cutting, keep in mind that it will be subject to higher temperatures. You will have to use more force to cut certain parts. Furthermore, the blade will tend to drift in one direction while cutting, which increases the risk of burns and smoke. To prevent this, you can apply a layer of beeswax or tape on the blade to provide lubrication.
0deg. Rake angle
For cutting precise curves, set the 0deg. For best results, the rake angle on a bandsaw blade should be set. This angle helps in maintaining the cutting edge's continuous edge with little buildup edge. Although the rake angle cannot be directly measured, it can be approximated by a force gauge acting in a straight line to the cutting edge. You can also empirically determine cutting-ratio values directly or indirectly.
The radii and kerf sizes will help you determine the correct rake angle. It's important to remember that different band saw blades can make different kerf sizes. You need to be aware of the material used in your material before you choose the right band saw blade. You can try the rake angle with a scrap of wood.
Wood Slicer
A band saw is a versatile tool that can cut tight curves and closed openings with ease. A few relief cuts can help make your job more straightforward. These cuts give the blade more space to turn. You should also make sure that you remove any waste from each cut. This will give it more room for turning. When you are done with the workpiece close the blade.
For most curves and small interior cuts, a 1/4" blade is the best choice. The 1/4-inch blade can be used to make precise inside cuts, without the blade slipping. However, for a more precise cut you'll need intersecting cuts made before cutting. For tight curves and corners, be sure to adjust the depth gauge on your saw to prevent binding. A smaller radius blade can be used to cut the material.
Freshcut 37

The Freshcut 37 bandsaw blade will allow you to cut tight curves on your bandsaw. The blade has a relief cut which allows it to finish the curve and move on to the next steps. The blade moves around the cut, leaving little waste so that there is room for turning. Before you begin cutting curves, make sure that you always back out any cuts. This will stop the saw from twisting in the next cut.
A variable pitch bandsaw blade is a good choice if you are planning to make many precise curves with your saw. This blade is capable of cutting a wider range of materials, including wood, metal, and even plastic. The variable pitch allows it to be used for a wider range of applications. It is also perfect for cutting metal, including plastic, metal, and composites. This bandsaw blade is heat-treated steel and durable for extra durability.
FAQ
Is it necessary to be a genius in woodworking to succeed?
No. It is not rocket science to woodwork. To create stunning works of art, anyone can learn to use basic power tools.
How often do I need to buy new supplies
You'll probably have to replace some of your tools over time. If you're using hand tools, you'll need to sharpen them regularly. If you are using power tools, you will need to purchase replacement parts regularly. Avoid buying too many products at once. Spread your purchases out over several months.
What kind tools do carpenters use to build?
Carpenters use a hammer as their most common tool. A hammer helps to carpenter pound nails into the wood. A hammer is used to hold pieces together during a project. Other tools include clamps. pliers. screwdrivers. measuring tape. pencils. saws. drills. wrenches.
What wood items do well?
Wood that has been harvested sustainably is the best-selling type of wood.
Oak, cherry and mahogany are the most sought-after wood types for furniture.
These woods are very strong, but they also have beautiful grain patterns and colors. If they are well cared for, they can last many years.
To prevent moisture damage to wood furniture, it is important that it be painted before any other surfaces. This covers all surfaces, drawers included, as well as doors and handles.
A paint that resists water is the best choice to ensure that furniture lasts a long time.
It is recommended to use an oil-based primer, then apply two coats. It is possible to apply multiple coats depending on how heavy the wear.
Avoid spray cans and aerosol paints. These products can evaporate quickly and emit harmful fumes.
What material would your recommendation be to learn woodworking?
Start off with softwood like pine and poplar. After you are comfortable with the softwoods, move to hardwood.
Statistics
- In 2014, there were just over 237,000 jobs for all woodworkers, with other wood product manufacturing employing 23 percent; wood kitchen cabinets and countertop manufacturing employing 21 percent. (theartcareerproject.com)
- The U.S. Bureau of Labor Statistics (BLS) estimates that the number of jobs for woodworkers will decline by 4% between 2019 and 2029. (indeed.com)
- Overall employment of woodworkers is projected to grow 8 percent from 2020 to 2030, about as fast as the average for all occupations. (bls.gov)
- If your lumber isn't as dry as you would like when you purchase it (over 22% in Glen Huey's opinion…probably over 10-15% in my opinion), then it's a good idea to let it acclimate to your workshop for a couple of weeks. (woodandshop.com)
External Links
How To
How to join wooden boards without using nails
Woodworking is a favorite hobby. Woodworking can be a fun hobby because you can work with your hands to make useful objects from wood. Sometimes you may want to join two pieces together of wood without using nails. This article will explain how to do this so that your woodwork projects stay beautiful.
Before joining the pieces of wood together, you will need to first trim any edges. Do not leave any sharp corners as they could cause problems down in the future. After you have completed this step, you are ready to glue your boards together.
If you are working with hardwood, only one side should be glue. Use glue on both the sides for softwoods, such as cedar or pine. Once you have applied the glue, press down on the boards until they are fully attached. Before you proceed to the next step, be sure to let the glue dry completely.
Once you've glued your boards together you will need to drill holes in the joints to accommodate screws. Depending on the type of screw that you use, the size of these holes will vary. For example, if your screw is a 1/2-inch wooden screw, drill a hole that is at minimum 3/4 inches deep.
Once you've drilled your holes, you'll want to drive the screws through the joint and into the backside of the board. Do not hit the boards' front surfaces. It will ruin the finish. Don't drive the screws too far into the end. This will prevent splitting the wood's end grain.
Protect your finished project now. You can seal the furniture pieces or cover the top. It doesn't matter what method you use, you want something that will last many years. Examples include oil-based varnishes and polyurethanes, shellac, lacquer and others.
These products can generally be found in any home improvement shop. It is important to ensure that you purchase the correct product for the job. Remember that some finishes can be toxic, so you should not use them indoors. Always wear protective gear when handling any of these finishes.