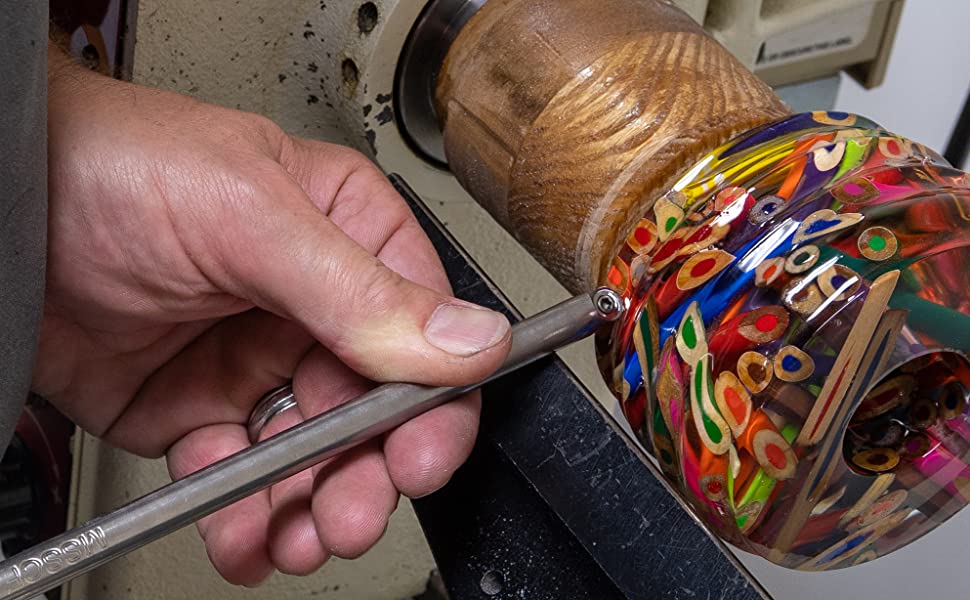
A bowl gouge is a tool used for carving or smoothing out the surface of a bowl. Its shape and size determine what kind of work you are able to do with it. The gouge comes with an instruction leaflet. It includes a forged tip that allows you to make small cuts inside and outside of a bowl. The gouge is also made with a balance and edge for fine projects. It is made of high-quality steel.
Shape
A bowl gouge can be a sharp tool to shape bowls. It is made from wood and can cost a lot. For just a few hundred dollars, you can get a gouge at the local home-center. This wood is easy to work with and can be used for several exterior cuts and hollowing. For those who are just beginning to make bowls, a 2x6 piece might be the best size to use. Because it's inexpensive and easy-to-use, this piece is a great choice.
There are many styles of bowl gouges available. A basic bowl gouge has a diameter of 5/8", while a 3/4" gouge can be slightly larger. Although bigger tools are generally more efficient they do not necessarily make a better tool. You should experiment with different sizes and gouges until you find the right one for you. Remember that each turner has a preferred grind and should experiment with different tools until you find one that suits them best.
Size
To size bowl gouges, there are two main systems. English and North American systems are different in that they measure gouges by the diameter of the rod and the flute width. The same gouge in one system is labeled as 1/2'' while the other uses 5/8" or 1" diameter. This difference in measurements can make the gouge more accurate and help you choose the right size to fit your lathe. To choose the proper bowl gouge, first determine the diameter of the bowl you're working on. Then choose the right size according to the bowl's size or the flute of the gouge.
A larger bowl gouge has many advantages, but they are heavier and more bulky than smaller ones. Therefore, beginners should purchase a smaller bowl tool and increase it gradually. For woodworkers who are more experienced, it's a good idea not to limit yourself only to one size. After you've mastered the art of woodworking, you can buy larger bowl gouges if necessary. The bowl gouges made of carbon steel are more durable than stainless ones, but they require more maintenance.
Function
A bowl gouge performs two functions. It prepares a bowl's exterior surface for sanding. The left wing of the gouge pivots on its tool rest. The cutting edge of the gouge contacts the wood as soon as the handle is raised. The cut moves away from wood, creating a smooth, ready for sanding surface. A bowl gouge also has one cutting edge: The bevel.
A bowl gouge’s angle of bevel can vary from 40 degrees to 45 degrees. This will vary depending on the circumstance. For example, large angles with bevels are ideal for turning deep bowls. For cutting beads or spindles, you can use smaller angles. You need to consider what the angle is going to be used for. Large bevel angles can be dangerous and difficult to achieve.
Handle
For support and control of the bowl's curvature, keep the bowl gouge handle close to your body while cutting it. While sweeping the handle to make a convex bend in the bowl's surface, hold the tool rest securely with the left. Adjust the height of your tool-rest so you can work at the desired depth. Depending on the size of your bowl, a sharp knife should be capable of cutting up to one inch into the bowl.
A bowl gouge can be shaped like a cup and made from a flat steel rod. It usually has a concave area, or flute, that is hollowed out during the milling process. There are a few bowl gouges with hardwood handles. But, you can also get other materials. To make it easier to cut large areas, some bowl gouges come with a huge handle.
FAQ
Can I refinish furniture that I make?
Yes! There are plenty of ways to refinish old pieces of furniture without having to pay a pro. Here are a few suggestions:
Use sandpaper for removing stains and scratches. Use a clean cloth to wipe the surface.
Use clear polyurethane varnish. Allow to dry thoroughly before moving furniture.
Acrylic paint can be used to paint furniture.
Use stain instead of paint. The furniture will have a rich look thanks to the stain.
Use shellac wax. This will protect and shine the wood.
What tools should I start with when becoming a woodworker?
Woodworking is an art form that requires patience and practice. It takes time to learn how to use all the different tools and techniques required for woodworking.
There are many types of woodworking equipment on the market today. Some prefer to use power tools, while others prefer to use hand tools.
Your choice, however, is up to you. However, you need to ensure that the tool you use is the right one for the job. If you don't have any experience, you may consider starting with a basic set of hand tools.
You might also consider learning how to use the router to create intricate shapes from wood. These are available at most hardware stores.
How long does it take for furniture to be finished?
It depends on the type of wood you choose, the complexity of the design, and the amount of finishing you apply. Hardwoods are more difficult to maintain than softwoods. Hardwoods can also be more costly than softwoods. But they last longer, and resist moisture better. The process of finishing a piece of furniture typically takes anywhere from one week to three months.
What is the difference between a hobbyist woodworker and a professional woodworker.
Hobbyists enjoy creating things out of wood. Professionals tend to focus on the quality. Hobbyists tend to take pride and share their creations with family and friends. Professionals will spend hours researching designs before they begin working on a project. They will pay attention to every detail, from selecting the best materials to finishing the project perfectly.
What's the difference between plywood vs particle board?
Plywood is a combination of layers of wood, which are then pressed together under high pressure. Plywood can come in many thicknesses and is used for flooring and cabinets. Particle board can be made from sawdust, resin, and then compressed to make large blocks. This board is commonly used in home improvement projects. Both boards are strong and can be easily cut.
How do I know what tools are best suited for me?
It's important that you consider your needs and preferences while shopping for tools. Do you prefer metal or plastic handles? What size of nails and screws do your hands use most? Do you prefer to use hand tools or power tools?
How often should I buy new supplies?
You'll probably have to replace some of your tools over time. If you are using hand tools, you will need to sharpen them frequently. And if you're using power tools, you'll need replacement parts periodically. Try spreading your purchases over a few months so you don't buy too many at once.
Statistics
- The U.S. Bureau of Labor Statistics (BLS) estimates that the number of jobs for woodworkers will decline by 4% between 2019 and 2029. (indeed.com)
- In 2014, there were just over 237,000 jobs for all woodworkers, with other wood product manufacturing employing 23 percent; wood kitchen cabinets and countertop manufacturing employing 21 percent. (theartcareerproject.com)
- Most woodworkers agree that lumber moisture needs to be under 10% for building furniture. (woodandshop.com)
- Overall employment of woodworkers is projected to grow 8 percent from 2020 to 2030, about as fast as the average for all occupations. (bls.gov)
External Links
How To
How to stain hardwood
Stain wood is a process that involves applying chemicals to the surface of wood, which changes its color. This chemical reaction causes the wood to change from white to brownish red. While oak is the most widely used type of wood for staining purposes, other types of wood are also available.
There are many ways to stain wood surfaces. One method involves mixing the stain and a solvent and then spraying it on the wood. Some methods involve a mixture of water and dye that is applied directly to the wood. Stains can also be mixed into paints and varnishes, becoming part of the finish coating.
Preparing the surface is the most important step in staining wooden surfaces. The wood must be thoroughly cleaned to remove all grease and dirt. Sanding smoothens any scratches or rough spots. You must then decide on the type of stain that you wish to use. There are two basic kinds of stains: penetrating stains and non-penetrating stains. Penetrating stains penetrate deeper into the wood than non-penetrating ones, making them ideal for dark colors such as mahogany. Non-penetrating oils work best when used with light colors, like maple.
Once you have decided on the stain type that you want, get your tools ready. Because you can spread the stain evenly with a paintbrush, it is ideal for applying them. You should also have some handy rags to wipe up excess stains after you finish painting. If you plan on mixing the stain yourself make sure that you have enough containers to hold the different components.
Once you have prepared your materials, start by cleaning the area where you plan to stain the wood. To remove dirt and dust, use warm water and soap. Wipe the entire piece of furniture with a rag dampened with clean water. Take care to remove all debris and dirt, especially if you are planning on staining darker wood.
The stain should be applied next. Apply the stain by brushing or spraying it onto one side of the furniture. Move slowly and carefully along the grain of your wood until you reach its opposite end. The stain should not drip off of the wood's edge. Before you proceed with the next steps, let the stain dry completely.
Apply a clear polyurethane sealant to protect the painted surface. Three coats of polyurethane sealing agent are required. Allow the third coat to dry overnight before sanding the final coat.